Pages

Thursday, September 15, 2011

photography: a new lens

 I don't have much to say today. I haven't been feeling great, have had no energy or motivation to do anything. So I've been sitting around doing little to nothing thinking of all the unfinished projects I have. Which are a lot.

I had a birthday almost 2 months ago and my husband bought me this wide angle macro adapter lens. Which is pretty cool because my favorite sorts of photography are landscapes and close ups. An actual wide angle lens and macro lens would be really expensive so I thought this was worth a try until I can get the real thing. I hadn't touched the new lens until just a couple days ago.


There was this spider web between some rocks and it captured some rain I thought was kind of cool. The macro adapter required me to get extremely close--the lens almost touching the web. Then the auto focus was having a really hard time focusing in. I ended up manually focusing which was also hard because I was scrunched down in the rocks, holding the camera with one hand, focusing with the other, while trying to not fall over. And being scrunched over hurt and got me all sick-like and I was mostly laid up for the rest of the day. (I hate being pregnant.) But I did try out the new lens and while I'm guessing it won't compare to the real thing, it's good enough for now.


Friday, July 29, 2011

Tuesday, July 26, 2011

photography: project 64 & i need votes please!

Hey, wow, awesome! I'm a favorite for my last link up with Project 64! Can you go vote for me for the monthly favorite? (Well, only if you find mine to be the best or even if you don't think I am the best and love me the most.) And, thanks for all your nice comments on my Sedona photo!


This week's link-up: Wisteria.


project64 button

Wednesday, July 20, 2011

photography: project 64 - mac & cheese

  This is one of my favorite pictures I took in Sedona.


And had I remembered to link up for sea green, I would have posted this:


project64 button

Monday, July 18, 2011

at the beach

my son and his cousin. they're only a month apart a had fun running back and forth from the water to their sand castle. 
all the boys getting more water for the moat.

at first eli wouldn't set foot in the sand. then he got over it and spent the rest of the day running back and forth and playing in the waves. the waves overtook him a couple times and he ended up with sand everywhere. 

we had dinner at Ruby's at the end of the pier. it was a perfect beach day.

Tuesday, July 12, 2011

photography: touch-up & a question

 before
 after

I used the air brush tool at opacity 23% to airbrush some of the shadows off his face. I also brightened it a little.

I have a question for someone who knows what they're doing. I shot this in the evening at f/4.5, 1/30s, 800 ISO and the flash on. The shutter speed wasn't fast enough to capture Eli without blurring a little around his hands but my aperture was as open as it goes (kit lens). I also didn't want to increase the ISO anymore because I didn't want more noise. So if I'm going to shoot kids in the evening, is my only option to get a better lens with lower f stops?

Touch Up Tuesday's at the Paper Mama

Wednesday, July 6, 2011

tutorial: anthropologie knockoff - sugar work skirt

The Anthropologie Sugar Work Skirt retailed for $118. After I saw it on Anthro I saw it on Glee (but I already wanted it before that). Quinn wears it while at the nose doctor with Rachel.
 
I love yellow and thought this would be great for the summer. The Anthro version was too short for me and um, too expensive. I made it for about $20. Ready?

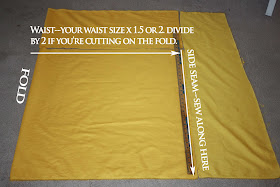
I used this tutorial from Made for the basic skirt only I used 3" elastic for the waist. I also went somewhere in between the 1:2 / 1:1.5 waist width ratio. (That makes sense when you read her tutorial.) Grosgrain Fabulous also has a gathered skirt tutorial you could use. I bought 2 yards of yellow cotton with a coupon at Joann's for about $10.
Sew your side seam, serge or fold over to finish the top of the waist, fold over just slightly wider than your elastic and sew. Insert elastic, sew elastic ends together, finish off hole that you used to insert elastic. (Really just use Made's or Grosgrain's tutorials. I didn't take pictures of these details.) Hem the skirt to length.

On the Anthro skirt it looks like they sewed lines over the elastic. I couldn't find the skirt in the store so I'm just guessing on this. But before I sewed over the elastic it was super bulky at the waist since I used 3" elastic so it's better for your waist-line if it's sewed down.
So, to sew over elastic and still have it stretch, you have to stretch the elastic as much as you can while you sew. I pulled the elastic behind the machine foot and in front (pull in front and in back otherwise you will pull the skirt right out from under the foot) then just feed it through and keep stretching as you go. Sometimes my pulling would make the machine "skip" stitches here and there, but you can't tell once it's done. I did 5 rows of stitches and they aren't super even. But again, you can't tell once it's done.

Once the skirt part is made you can start with the trim. You'll need about 15 yards, depending on how wide you make the skirt. I ended up getting mine on eBay for $10. I used 3/8" baby chinese gimp. 1/2" would probably work, too and there's lots of different kinds on Etsy, eBay or Joann's.
You want the top loops to be evenly spaced out across the whole skirt. The cross section of the top of the large bottom loop should be half-way between two top loops. (Did that make sense?) Mine aren't perfect, but good enough for me. The bottom of the large loop goes down to just above the hemline seam.
 Pin down at the loops and cross points and at the bottom.
At this point I went ahead and pinned the next two layers of trim down.
I eyeballed about a 1/3 of the way between two loops.
Then again about halfway between the next two. With the last layer of trim I alternated going under and over the other layers so it was weaved through a little.
It was at this point that I took the skirt to my machine to sew and realized it was going to be a little difficult. I had lots of pins that didn't hold the trim down very well and it was hard to manage under the machine foot. I even tried to hand sew it down but that was worse. 

I decided it would have been easier to sew one layer of trim at a time. I couldn't have weaved the other layers through but it would have been more manageable. I also thought it would have helped if I had used a fabric glue to glue each layer in place before sewing. As I sewed I had to move the trim into place and it didn't always work out perfectly. Several large loops ended up a little off, the criss-cross trellis section was often uneven, and the top loops weren't quite what I wanted.

I would also suggest sticking to trim from Joann's or a fabric store. The stuff I got on eBay was much cheaper quality than I found at Joann's. I was apprehensive to use it but didn't want to wait even longer to get back to Joann's and special order all that I needed and then go back again to pick it up when they got it in.

And here it is finished!
 
And here's how I wear it:
 tank, cardigan, belt--clearance Anthro, leather ruffle necklace and lizard cuff--Slightly Askew, shoes--Steven by Steve Madden

Tuesday, July 5, 2011

home remodel wish list: splash pool

I just noticed a new show on HGTV. It's called My Yard Goes Disney. I thought that would be an awesome show for my family. It would be sweet to have a big ol' crew come in and just knock out the perfect backyard, but I'm not holding my breath (and I'm not forking out the money when J and I are perfectly capable of doing it ourselves.) My yard is currently a large span of weeds and dirt. We've been making plans for extending the patio, rubber mulch for under the kids play set, and artificial grass for a play area. We also love the idea of this sunken trampoline.

part of my sad backyard and miniscule patio

Anyway, I saw a recent episode of My Yard Goes Disney were they install this little splash pool as part of the pirate's adventure backyard. I think it's perfect. It's only 18" deep and kind of like a big awesome pond in your yard. This is a pool we could build ourselves, drain in the winter without stressing about the cost to refill it once it warms up, and wouldn't worry about drowning kids. J is actually on board with it.


Ours wouldn't be anywhere near as elaborate as this one. And we have to price it out to see if it's even feasible. Those are working water cannons for about $800. (I'm thinking my kids won't be so lucky to have three on their splash pool, or even one.) We won't have a pirate's ship, stone walls or a million plants to kill water, but I think it'd still be cool. My kids are happy with the blow-up pools from Wal-Mart so I think they'd be thrilled. Would your kids mind if they only had a little mini pool and not a big full-size one?

Friday, July 1, 2011

4th of july prints

I really wanted to have a 4th of July bbq but it just didn't work out. I think my husband will end up going to work and then we'll take a drive up to the mountains for some hiking and park-playing. (I'm also really close to finishing the tutorial for the yellow Anthro skirt.Hopefully next week.)

These are both sized to 11x14. Print as you will (just no selling them of course.)


Have a happy 4th of July!